If you are interested in the development of Fusion Web Application (ADF) by using JDeveloper, you can follow tutorials provided in
Oracle JDeveloper - Official Home Page.
JDeveloper is a free development (IDE) tool that Oracle supplies to help developers build applications for deployment onto both the middleware platform and the database. In this article, I would like to shows the steps for creating a Web Appliation by using Oracle ADF and Oracle ADF Business Component to map Java objects to HR Schema (a database schema provided in Oracle Database 10g Express Edition
which is free to download and install it from Oracle Databae 10g Express Edition).
After the installation of JDeveloper 11g, you can start JDeveloper using the shortcut your installation provided.
Oracle JDeveloper 11g will prompt the following figure during starting JDeveloper.
When the dialog "Select Role" prompted to choose a role, select the "Default Role" and then press "OK" button.
If you select other options (Such as Java EE Edition), it will reduce the options available in that JDeveloper session. This can assist in reducing the complexity of the IDE and it is tailored to display what type of work you need. You can turn off this dialog by unchecked the "Always prompt for role selection on startup" checkbox.
The IDE window of JDeveloper will be shown as the following figure. A "Tip of the Day" dialog will be displayed. You can turn off this dialog by unchecked the "Show tips at startup" checkbox.
Click "New Application" in the "Application Navigator" to create a new application.
Type your application name, di
rectory and application package prefix. By selecting the Fusion Web Application (ADF) in the options of Application Template, you can create a web application with ADF Framework.
In the step 1 of 5 for creating Fusion Web Application (ADF), you can press "Finish" button to create the application instantly after you have typed the application name, di
rectory and application package prefix. Of course, you can go to next step to change the project setting by "Next" button.
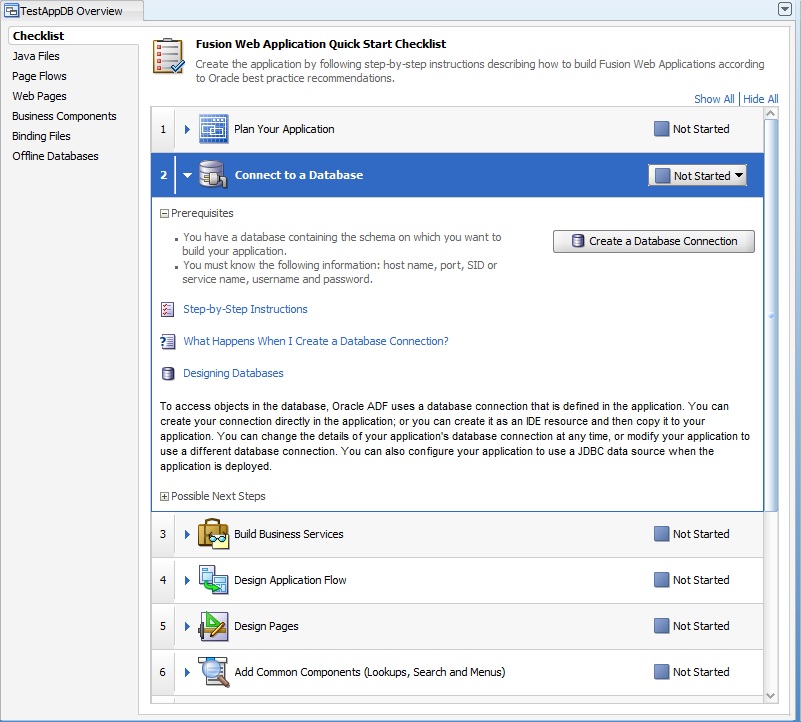
After that, you can see the following figure after a Fusion Web Application (ADF) is created. The
Overview pane displays a Checklist as a guide for developing a Fusion Web Application (ADF). The Checklist of "TestAppDB Overview" is displayed by default when a Fusion Web application (ADF) is created.
In the "Application Navigator", you will see two new projects, one called
Model and the other called
ViewController.
JDeveloper provides a "Checklist" for you easy to connect a database. Click "Create a Database Connection" button in the step 2 "Connect to a Database" to get the pop-up dialog "Create Database Connection".
Alternatively, "Connect to a Database" can be done in the "Application Resources" of the "Application Navigator". Choose "Connections" under the "Application Resources" and then right click your mouse and click "Database" of the context menu "New Connection" to get the pop-up dialog "Create Database Connection".
In the pop-up dialog "Create Database Connection", type the Connection Name, Username (eg. "hr") and Password (eg. "hr") and the SID (eg. XE - a default SID of Oracle Database 10g Express Edition) for connecting to HR Schema. Press "Test Connection" button to test the connection whether is successful.
Press "OK" button if the connection is success. If you cannot get the successful message "Success!" of the database connection, connect to the Oracle Database and then unlock the user account "HR" (Since the user account "HR" is locked by default in XE).
After a database connection "TestAppDBConn" is created, the "TestAppDBConn" is shown under the "Connections" resources of the "Application Resources".
Glossary:
IDE - Integrated development environment


沒有留言:
張貼留言